Curves
Curves are RapidRAW's most precise tonal and color tool. Four curves are available:
- Luma, affects perceived brightness without changing hue.
- Red, adjusts the red channel only.
- Green, adjusts the green channel.
- Blue, adjusts the blue channel.
Switch between channels via the tab strip at the top of the Curves group.
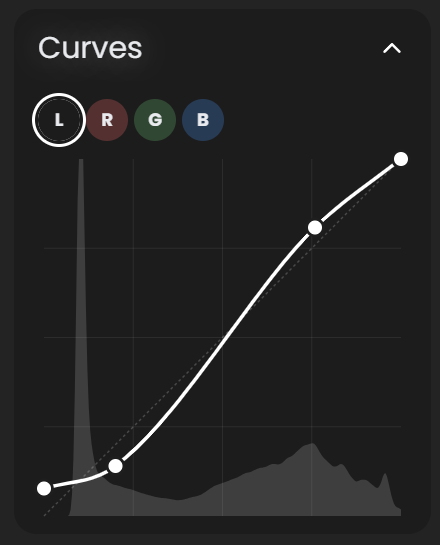
Anatomy
The curve is a 2D editor:
- Horizontal axis = input value (0 = darkest, 255 = brightest).
- Vertical axis = output value.
- The default curve is a straight line from (0, 0) to (255, 255), input passes through unchanged.
Points on the curve let you remap input values to new output values.
Editing
| Action | How |
|---|---|
| Add a point | Click anywhere on the curve. |
| Move a point | Drag it. |
| Delete a point | Right-click on the point. |
| Reset a single channel | Double-click the channel tab. |
You can place up to 16 control points per curve. Between points, RapidRAW interpolates with a smooth monotonic cubic spline, no overshoot, no kinks. The 0 and 255 endpoints are always present; you can drag them inward to set the black or white point for that channel.
Common curve shapes
Classic S-curve (more contrast):
- Add a point in the lower third, drag it down slightly.
- Add a point in the upper third, drag it up slightly.
- Result: brighter highlights, darker shadows, more punch in the midtones.
Faded film look (lifted blacks):
- Drag the bottom-left endpoint upward (e.g. from 0 to 25).
- Result: blacks become dark grey; the image looks "matte" or "filmic."
Cooler shadows / warmer highlights (split toning):
- On the Blue curve: drag the lower-left endpoint up slightly (cooler shadows).
- On the Blue curve: drag the upper-right endpoint down slightly (warmer highlights).
- Or use the inverse on the Red curve for the opposite effect.
Pure black & white point reset:
- On any channel, drag the lower endpoint horizontally to the right to clip darker tones to black.
- Drag the upper endpoint horizontally to the left to clip brighter tones to white.
New to this? Why use curves instead of Contrast / Highlights / Shadows?
The Light sliders (Contrast, Highlights, Shadows, etc.) are convenient, but each one applies a fixed shape across a range you don't fully control. Curves give you that exact shape, point by point. If you want more midtone contrast without changing the shadows, a Contrast slider can't do that cleanly; a curve with a steepened middle but flat tails can.
The per-channel R/G/B curves are also the cleanest way to do color grading via tone: shift the Blue curve down in the highlights to add yellow to bright tones, or up in the shadows to add blue to dark tones, the building blocks of "split toning."
Copy and paste between channels
Right-click on a channel tab to copy that curve, then right-click another channel tab to paste. Useful for matching R, G, and B curves when you want a precise tonal shape applied uniformly.
In masks
All four curves (Luma, Red, Green, Blue) are available inside masks. This is one of the most powerful local adjustment tools, apply a custom S-curve to just the subject, or shift the highlights blue inside a sky mask.
Reading the curve
The curve display includes a faint histogram in the background showing the distribution of tones in the current channel. Use it as a guide, for example, if the histogram doesn't reach all the way to the right, you can drag the upper-right endpoint left to expand contrast without clipping anything.
See also
- Basic, slider-based tonal control for quicker edits.
- Color, wheels and HSL for color-specific work.
- Workflow: Color Grade with Wheels, pairs nicely with per-channel curves.