Masks
Masks are RapidRAW's local-adjustment system. Instead of editing the entire image, you define a region and your slider changes only apply inside that region.
Open the Masks panel with M.
How masks are organized
A mask is a stack of one or more submasks. Each submask is one of the types below. Submasks combine using a mode (additive, subtractive, intersect), so you can build complex selections from simple primitives.
Mask Container
 ├─ Submask 1   (mode: additive)
 ├─ Submask 2   (mode: subtractive)
 └─ Submask 3   (mode: intersect)
   → Adjustments applied to the resulting region
A photo can have many mask containers (for separate regions you want to adjust independently, like a sky mask and a subject mask).
Mask types
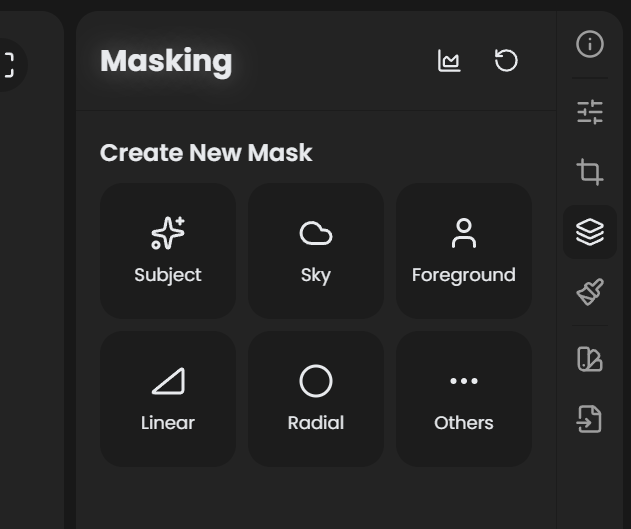
There are 11 mask types, available from the + New Mask menu (the menu is split into common picks plus an Others submenu).
AI-generated
These use neural-network models that ship with RapidRAW. The first time you use one, the model downloads (a one-time fetch into the app data directory).
| Type | What it selects |
|---|---|
| Subject | The main subject of the photo (people, pets, objects). Best on photos with a clear subject against a less complex background. |
| Sky | Everything that looks like sky, including cloudy, dusk, and night skies. |
| Foreground | Foreground vs background separation. Useful when there's no single distinct subject. |
| Depth | Depth-aware mask. Selects regions by their distance from the camera; useful for atmospheric depth grading. |
AI masks generate as a finalized region, but you can refine them by adding additional submasks (Brush, Linear, etc.) in subtractive or additive mode.
Geometric / gradient
| Type | What it does |
|---|---|
| Linear | A straight gradient mask. Drag to place start and end points; the mask fades between them. Used for skies, landscape grads, simulated split-tone. |
| Radial | An elliptical gradient mask. Drag to place; resize and rotate the ellipse. Used for darkening corners, focusing attention, vignettes. |
For both, the feather controls the width of the gradient transition between selected and unselected.
Painted
| Type | What it does |
|---|---|
| Brush | Paint the mask manually with a configurable brush size, hardness, and opacity. Hold Ctrl+↑ / Ctrl+↓ while in the Masks panel to resize the brush by 10 px. |
| Flow | Fluid-style brush that varies pressure and rasterizes naturally for organic regions. |
Parametric
| Type | What it selects |
|---|---|
| Color | Pixels in a specific hue/saturation range. Click a color in the image to set the target; tune range and feather. |
| Luminance | Pixels in a specific brightness range. Useful for "select the highlights" or "select the shadows" without an AI model. |
Whole image
| Type | What it does |
|---|---|
| Whole Image | No mask; affects the entire image. Useful for layering an extra adjustment "stage" on top of your global edits without overwriting them. |
Quick Eraser
Quick Eraser is technically a mask type but it lives in the AI panel, not the Masks panel. It combines an AI subject selection with LaMa inpainting in one click: paint roughly over an unwanted object, RapidRAW segments it, and the inpainter fills the area with plausible content. See Inpainting → Quick Erase.
Combine modes
When a mask container has more than one submask, each submask after the first has a mode that controls how it combines with the running selection:
| Mode | Behavior | Mental model |
|---|---|---|
| Additive | The submask region is added to the selection. | Logical OR. |
| Subtractive | The submask region is removed from the selection. | Logical AND-NOT. |
| Intersect | Only pixels that are in both regions remain selected. | Logical AND. |
Examples:
- AI Subject + Brush (subtractive): start with the AI subject, then erase parts the AI got wrong.
- AI Sky + Color (intersect, blue range): limit the sky mask to actually-blue pixels (skips a building the AI mistook for sky).
- Linear (top half) + Radial (centered, intersect): a horizontally-graded mask that fades to nothing at the corners.
Invert
Each submask has its own Invert toggle (flips that submask only). The mask container also has a master Invert that flips the final composited mask.
Use case: AI Sky + container-level invert = "everything except the sky."
Per-submask & per-container controls
Each submask has:
- Visible: toggle the submask off/on without deleting.
- Invert: flip the region.
- Opacity (0 to 100): fade the submask's contribution.
- Mode: additive / subtractive / intersect (for submasks after the first).
Each mask container has:
- Visible: toggle the entire mask.
- Invert: flip the final composite.
- Opacity (0 to 100): fade all adjustments inside this mask.
- Name: give it a label so you remember what it's for ("Sky cool", "Subject bright", etc.).
Brush settings (for Brush, Flow)
When a brush-style submask is active:
| Control | Range | What it does |
|---|---|---|
| Size | 1 to 200 px | Brush diameter. Resize with Ctrl+↑ / Ctrl+↓ (10 px steps). |
| Hardness | 0 to 100 | Edge softness. 100 = hard edge; 0 = very soft. |
| Opacity | 0 to 100 | Per-stroke opacity. |
Touch and pen input are supported (including pressure on supported tablets).
Performance
All AI masks (Subject, Sky, Foreground, Depth) currently run on the CPU because of dependency limitations in the ONNX Runtime build used by RapidRAW. Expect a few seconds per mask on a modern CPU; older or low-power CPUs may take longer.
This does not affect the rest of the editing pipeline: Crop, Tone, Color, Curves, and Effects all run on the GPU and are realtime.
New to masking? Start here.
The simplest workflow: open a portrait, switch to Masks (M), click + New Mask → Subject. Wait for the AI to finish (a few seconds). Now any slider you move in the right panel applies only to the subject. Drag Exposure up: the subject brightens but the background doesn't.
To target the background instead: hit the mask container's Invert toggle. Now your edits affect everything except the subject.
For a sky: same flow, but pick Sky. Pull Saturation up and Luminance down for a punchy blue.
Workflow tips
- Don't fight the AI. If the Subject mask gets it 95% right, refine with a small subtractive Brush rather than starting from a Brush submask.
- Name your masks. A photo with five mask containers is much easier to revisit if they're labelled "sky cool, subject bright, foreground sharpen, etc."
- Toggle visibility, don't delete. When experimenting, toggle the eye icon: your work isn't lost if you change your mind.
- Mask intersect is underrated. Combining two simple submasks with intersect often produces cleaner results than tuning one complex region.
See also
- Inpainting for AI-driven object removal (Quick Erase).
- Workflow: Mask a Subject for a step-by-step recipe.