 RapidRAW
Color Management & HDR
Two things decide whether the colors you see match the file you export: which colors your monitor can show, and how RapidRAW converts the photo for it. This page explains the Display settings (Settings → Processing → Display), the HDR button in the editor toolbar, and the color space and HDR options when you export.
| You want to | Do this |
|---|---|
| See correct colors on a calibrated or wide gamut monitor | Leave Monitor Profile on Automatic (system profile). |
| See the extra colors your wide gamut monitor can show | Set Preview Gamut to Wide gamut and export in Display P3 or Adobe RGB. |
| Judge a photo for Instagram or a website | Keep Preview Gamut on sRGB and export in sRGB. |
| See bright HDR highlights | Turn on HDR in your system's display settings, then click HDR in the editor toolbar. |
| Share an HDR photo | Export as JPEG with HDR output on. |
New to this? Color spaces and gamut in two minutes.
A pixel in a file is just three numbers for red, green and blue. A color space says which real colors those numbers mean. The range of colors a color space (or a monitor) can show is its gamut.
sRGB is the small, safe standard: almost every screen and app assumes it. Display P3 and Adobe RGB hold more saturated colors, for example deep reds, oranges and teal greens. A monitor that can show them is called a wide gamut monitor.
An ICC profile is a small file that describes a color space or a device. Your monitor has one (made by the system or by a calibration tool), and exported photos carry one, so other apps know how to read the numbers.
How RapidRAW handles color
RapidRAW edits every photo in Rec. 2020, a very large color space. RAW files go straight into it, and JPEGs, HEICs and other files are converted into it from their embedded profile, so the wide gamut colors of an iPhone photo (Display P3) or a camera JPEG in Adobe RGB are kept. Only at the very end is the result converted once: for your screen, and separately for each export.
Color spaces
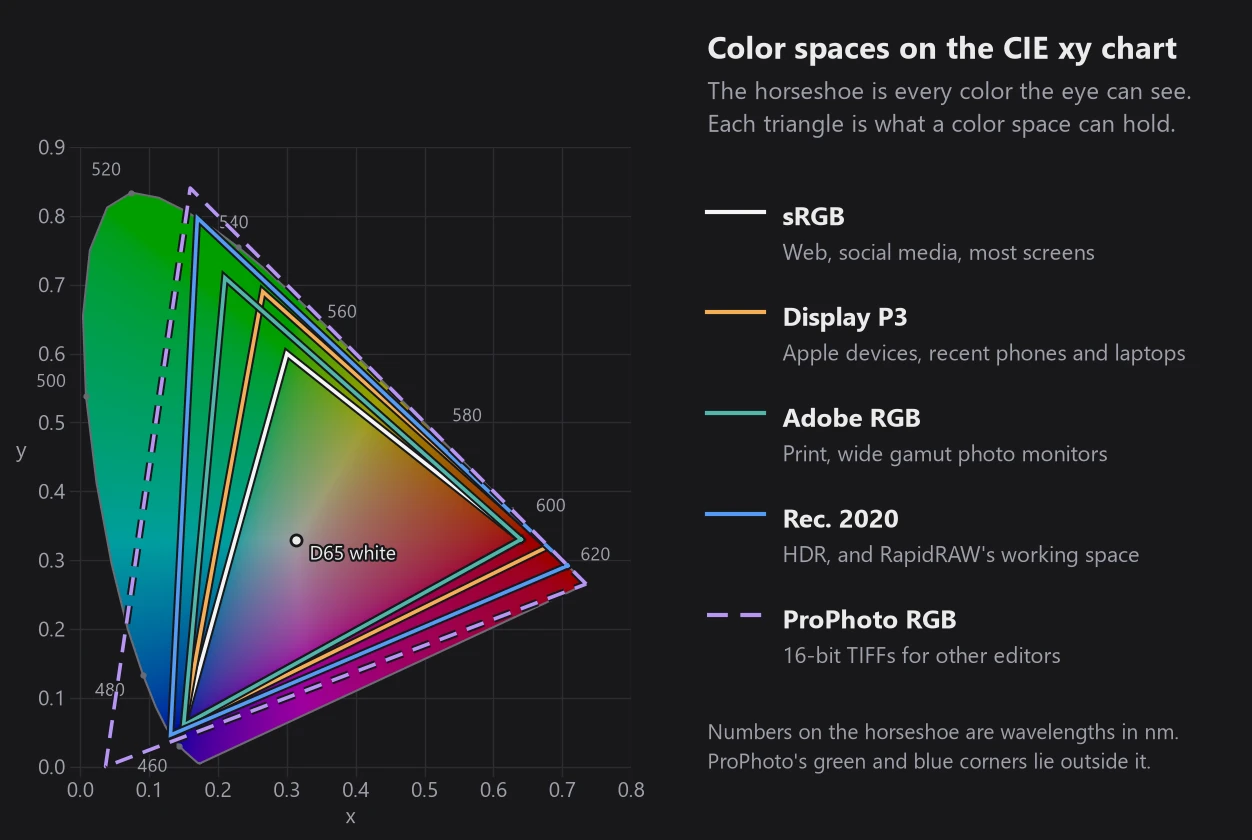
Display P3 and Adobe RGB are about the same size, but they grow in different directions: Adobe RGB reaches further into greens and cyans, Display P3 further into reds and oranges. ProPhoto RGB is so large that some of its corners are not real colors at all.
Monitor Profile
Settings → Processing → Display → Monitor Profile converts the editor preview to your monitor's color profile, so colors look right on calibrated and wide gamut displays. It never changes your exports.
| Option | What it does |
|---|---|
| Automatic (system profile) (default) | Uses what your operating system knows about the monitor. See below. |
| Custom ICC profile | Click Choose Profile and pick an .icc or .icm file. Use it when the system has no profile assigned, or to test a new calibration before you install it. |
| Off | No conversion. The preview's sRGB numbers go to the screen unchanged. Only useful to compare with an app that does no color management. |
What Automatic does on each system:
- Windows: RapidRAW reads the profile assigned to the monitor in Windows Color Management. When Windows manages color itself (HDR or Auto Color Management is on for that display), RapidRAW leaves the conversion to Windows.
- macOS: macOS always manages the color. RapidRAW tells it which color space the preview is in, and macOS converts it for the display.
- Linux: if your Wayland compositor manages color, RapidRAW leaves it to the compositor. Otherwise it uses the profile assigned to the display in colord (your desktop's color settings). Profiles that colord only made from the monitor's EDID data are ignored.
The line under the dropdown tells you what is happening:
| Message | Meaning |
|---|---|
| Using profile name | RapidRAW converts the preview to this profile. |
| Colors are managed by the operating system. | Windows, macOS or the compositor does the conversion. |
| No monitor profile found. The preview is shown as sRGB. | Fine on a normal sRGB monitor. On a wide gamut monitor, colors will look too saturated: assign a profile in your system settings or choose one with Custom ICC profile. |
| This profile could not be loaded. | The custom profile is broken or of an unsupported type. |
| Color management needs WGPU Direct Rendering. | Turn on WGPU Direct Rendering. On Linux this needs a Wayland session. |
Profiles with a matrix and tone curves work best, and most calibration tools make these by default. If a profile also contains lookup tables, RapidRAW uses its matrix and curves. A profile that only has lookup tables may not load. When you recalibrate, RapidRAW picks up the new profile on its own, without a restart.
Preview Gamut
Only shown while Monitor Profile is not Off.
| Option | What you see | Use it when |
|---|---|---|
| sRGB (default) | Colors as they will look in an sRGB export. Colors outside sRGB are brought inside, the same way an sRGB export does it. | You export for the web, social media, or for people whose screens you don't know. |
| Wide gamut | Also the colors beyond sRGB that your monitor can show. The name in brackets, for example Wide gamut (Display P3), is the space RapidRAW previews in, picked from your monitor. | You export in Display P3 or Adobe RGB, or print from a wide gamut file. |
Match the preview to the color space you export in. Example: a field of red tulips looks more intense in Wide gamut (Display P3) than in sRGB. If you post it on a website as sRGB, judge it in sRGB, or you will be disappointed by the export. On a monitor that can only show sRGB, both options look the same.
HDR preview
Normal (SDR) screens show white as the brightest thing they can. HDR screens can show highlights brighter than that white: the sun on water, a street lamp, the sky around the sun. How much brighter is called the headroom, counted in stops.
| Headroom | Highlights can be |
|---|---|
| 1 stop | 2x brighter than normal white |
| 2 stops | 4x brighter |
| 3 stops | 8x brighter |
| 4 stops | 16x brighter |
To see it in RapidRAW:
- Turn on HDR for the screen. On Windows: Settings → System → Display → Use HDR. On macOS, HDR screens such as the XDR displays are detected automatically; for an external HDR monitor, turn on High Dynamic Range in System Settings → Displays. On Linux you need a Wayland desktop that supports the Wayland color management protocol, with HDR turned on.
- Make sure WGPU Direct Rendering is on in Settings.
- Open a photo. An HDR button appears in the editor toolbar while the window is on a screen in HDR mode. Click it. It stays on until you click it again.
With HDR on, shadows and midtones look exactly as before. Only highlights above normal white get brighter, up to the headroom of your screen, at most 4 stops. RAW files often hold detail above normal white, so skies, sunsets and reflections gain the most. In the histogram and waveform, a dashed line marked HDR shows where normal white is; everything beyond it is HDR highlight.
The headroom depends on the screen and its settings:
- Windows: the peak brightness of the monitor divided by the SDR content brightness in the Windows HDR settings. Lowering SDR content brightness gives you more headroom.
- macOS: changes with the screen brightness. A MacBook at lower brightness has more headroom than at full brightness.
The HDR preview never changes your exports. A normal export is SDR, exactly like the preview with HDR off. To keep the bright highlights in the file, turn on HDR output when you export. If the second window is open on a screen without HDR, both windows show the SDR preview.
HDR photos
Some files carry more brightness than normal white. RapidRAW opens these as HDR:
| Kind | Files |
|---|---|
| Gain map photos | JPEGs with a gain map (Ultra HDR photos from Android phones, and other JPEGs with Adobe or ISO gain map data), AVIFs with a gain map, and HEIC photos from iPhones (HEIC on Windows and macOS only). |
| PQ and HLG | HDR AVIF, HEIC and JPEG XL files, and other files whose color profile marks them as PQ or HLG. |
| Linear float | EXR, Radiance .hdr and 32-bit float TIFF files. |
A gain map photo is a normal SDR photo with a small extra image inside that says how much brighter each part should be on an HDR screen:
Settings → Processing → Display → HDR Photos decides what RapidRAW does with gain maps:
- Automatic (default): gain map photos show their HDR highlights as far as your screen allows, with the HDR preview on. HDR exports use the headroom you set in the export settings. Other exports show the regular photo.
- Always as SDR: gain maps are ignored, and you edit the base image only.
When a gain map is used, it is applied before your edits, so all sliders work on the HDR version. PQ, HLG and float files always keep their full range, whatever this setting says. With HDR off, and in normal exports, their brightest parts are rolled off smoothly into white instead of clipping.
The line under HDR Photos shows whether your screen can show HDR: This display is in HDR mode, This display is not in HDR mode (turn on HDR in the system display settings), or that HDR needs WGPU Direct Rendering (and on Linux a Wayland session with HDR support).
Exporting: color spaces and HDR
The export color space and HDR options are in the Advanced section of the Export panel. Each export records its color space (as an embedded ICC profile, or in the JPEG XL header), so other apps read the colors correctly.
| Color space | Pick it for |
|---|---|
| sRGB (default) | The web, social media, messengers, most print labs, and anything you send to other people. If in doubt, use sRGB. |
| Display P3 | Photos viewed on Apple devices and recent phones, or in browsers that read color profiles. Apps that ignore profiles show it duller. |
| Adobe RGB | Printing, when your printer or lab asks for Adobe RGB, and wide gamut photo monitors. |
| ProPhoto RGB | 16-bit TIFFs that you keep editing in Photoshop, Affinity or another editor. Not for JPEG or the web: 8 bits are not enough for such a large space and smooth skies can show steps. |
| Rec. 2020 | HDR and video workflows. For normal SDR photos you rarely need it. |
The color space option applies to JPEG, PNG, TIFF, WebP and JPEG XL. AVIF exports are always sRGB.
HDR output is available for two formats:
- JPEG keeps the normal SDR photo and adds a gain map for HDR screens, like the phone photos above. Apps and screens without HDR show the normal photo, so it is the safe choice for sharing.
- JPEG XL becomes a true HDR file in PQ and Rec. 2020. It needs an HDR viewer; other apps may show it too dark or flat. The color space option is hidden, because it is always Rec. 2020.
HDR headroom (1 to 4 EV, default 2) sets how bright the highlights may get in the file. 2 EV (4x normal white) suits most screens. A higher value only helps on screens that can show it.
Troubleshooting
- There is no HDR button in the toolbar. The screen the window is on is not in HDR mode, or WGPU Direct Rendering is off. Check the status line under HDR Photos.
- Colors look too saturated or too warm everywhere. Usually a wrong or broken monitor profile. Set Monitor Profile to Off for a moment to compare, then recalibrate or assign the right profile. A wide gamut monitor without any profile also shows oversaturated colors.
- An exported photo looks duller in another app. The app probably ignores color profiles and reads your Display P3 or Adobe RGB file as sRGB. Export in sRGB for that app.
- The editor looks brighter than the thumbnails. Library thumbnails are always SDR, while the editor shows HDR highlights with the HDR preview on. That is expected.
See also
- Settings for all display options.
- Export for every export option.
- File Formats for every format RapidRAW opens and writes.
- Tone & Color for how the working space and tone mappers work.