 RapidRAW
Panorama, HDR & Focus Stacking
The three merges share one backend and run on the CPU. They all work in two passes. First RapidRAW loads the photos, does the slow analysis once on reduced copies and shows a preview in the merge window. When you change an option, only the last steps run again, on those copies, so the preview follows quickly. Save then loads every photo again at full resolution, renders the result and writes it next to the first photo. How to use the merge window is explained in Productivity Tools.
Loading the photos
What RapidRAW loads, and what it saves, depends on whether every selected photo is a RAW file:
| Selection | Loaded as | Saved as |
|---|---|---|
| Only RAW files | Linear RAW data: demosaiced and converted to the Rec. 2020 working space, no tone curve. Base Color Noise Reduction and Base Pre-Sharpening are skipped here. They run when you open the DNG, so this way they aren't applied twice. | Linear float DNG |
| Anything else: JPEG, TIFF, HEIC, or RAW files mixed with other files | Display-referred: RAW files get the default RAW look first, then every photo is converted to linear light. | 16-bit TIFF |
Photos are loaded in parallel, as many at once as the memory budget allows (the same estimate as for exports). The window keeps only reduced copies: up to 2048 px per photo for panoramas, 1600 px previews for HDR and focus stacking. Closing the window frees them.
Panorama and focus stacking blend gamma-encoded values and convert the result back to linear light before saving.
Panorama
The stitcher is a rotation-model pipeline in the style of Brown and Lowe: it assumes the camera turned around its lens between shots and works out that rotation for every photo.
Steps marked "live" run again whenever you change an option in the window. Everything above them runs once.
Finding and matching features
Features are found on a copy with a long side of at most 2000 px. In low-contrast scenes such as fog or a hazy sky, the contrast threshold drops to a half and then a quarter until enough features are found.
With up to 10 photos, every pair is tested. With more, each photo is only tested against its 6 most promising partners (from a quick test with its 400 strongest features) and its neighbours in the selection, which keeps a 30-photo panorama fast.
A pair counts as connected when RANSAC finds a homography with at least 16 inliers, and more than 8 + 0.3 × the number of matches. The inlier tolerance is 0.6% of the image diagonal, at least 3 px. This second rule rejects pairs where many features match by chance, such as repeating windows or waves.
Camera model and bundle adjustment
Each photo becomes a rotation and a focal length. The starting focal length comes from the 35 mm equivalent focal length in EXIF. Without it, it is estimated from the homographies, and as a last resort set to 0.9 × the long side of the photo. The rotations start from a spanning tree of the most confident pairs, beginning at the most central photo.
Bundle adjustment (Levenberg-Marquardt) then refines all rotations and focal lengths together, so that every matched point lands on the same spot from every photo. A Huber loss keeps single bad matches from pulling the result. When all photos have the same size and focal length, they share one focal length. Pairs that still disagree by more than 5 times the median error (at least 6 px) are dropped and the adjustment runs again, up to three rounds, as long as all photos stay connected.
With one lens and at least 24 matched points, a second pass also fits one radial distortion term (barrel or pincushion), shared by all photos. Finally the panorama is turned so that the average "up" of all photos points up, which levels the horizon. Panoramas shot top to bottom are detected and stitched on their side, then turned back.
Exposure and vignetting
A 40 x 40 grid of samples is taken in every overlap at 512 px. Samples near black, near clipping or on strong edges are skipped. From the rest, RapidRAW solves for one RGB gain per photo (exposure and white balance) and one radial vignetting curve (r², r⁴ and r⁶ terms) that all photos share, with a Huber loss against outliers. If the vignetting curve would make the corners darker than 30% of the center, or brighter than 110%, it is thrown away and only the gains are used. Exposure Compensation in the window switches these corrections on or off.
Projections
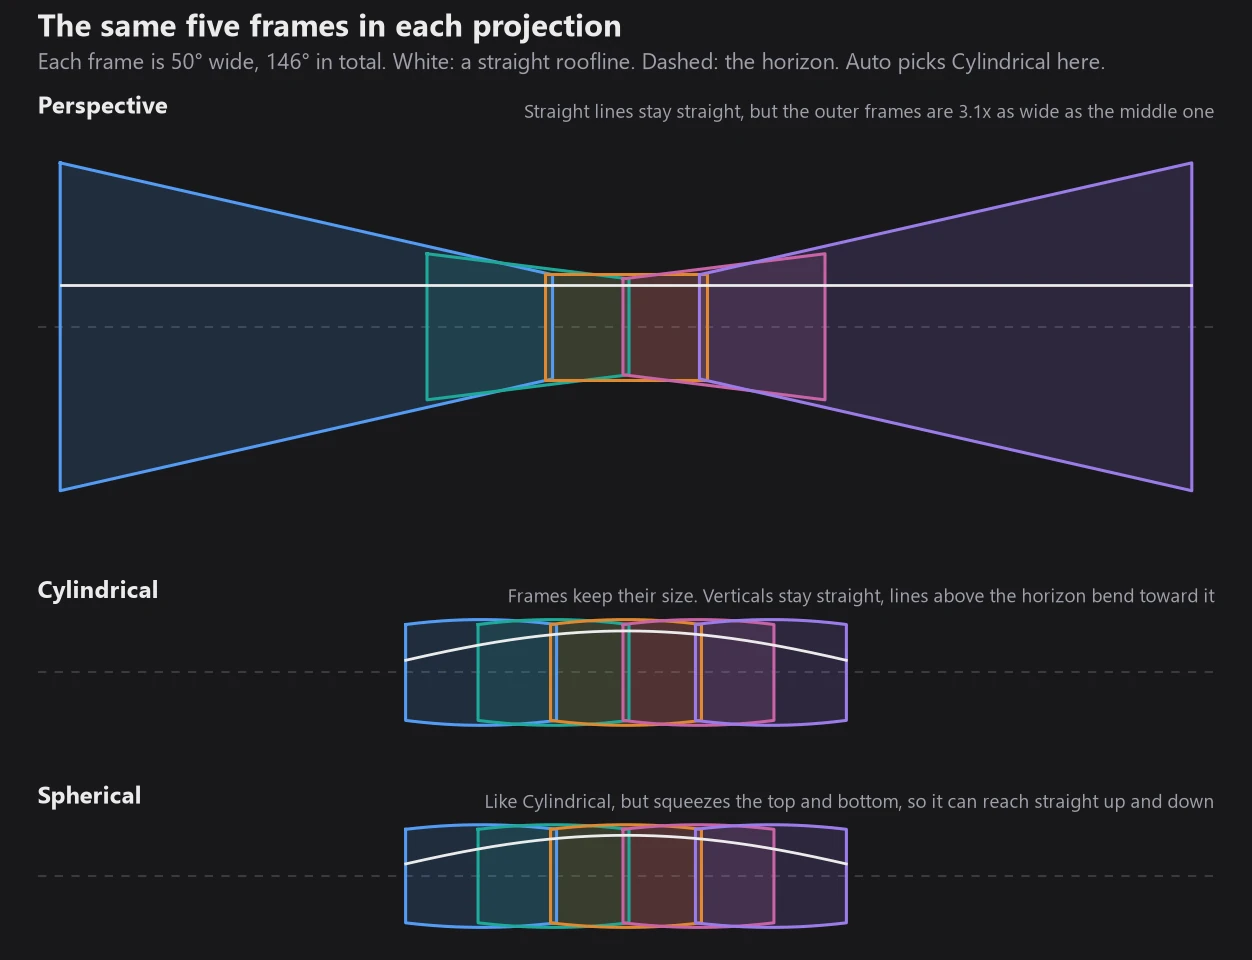
The projection decides how the sphere of viewing directions is flattened into a picture. A viewing direction has a longitude (left and right) and a latitude (up and down):
| Projection | Canvas position | Possible when | Auto picks it when |
|---|---|---|---|
| Perspective | tan of the angle, like a normal lens | not a full 360°, and every photo corner is within 80° of the panorama center | the panorama spans at most 100° horizontally and vertically |
| Cylindrical | longitude, tan(latitude) | nothing reaches beyond 75° up or down | Perspective isn't picked and the vertical span is at most 70° |
| Spherical | longitude, latitude | always | otherwise |
If you choose a projection that isn't possible, the stitcher falls back to Cylindrical or Spherical by the same rules and the window says so. The canvas uses the median focal length of the photos as its scale, so the center of the panorama keeps the full resolution of the photos. When to use which projection is explained in Productivity Tools.
Boundary Warp and Auto Crop
A panorama never has straight edges. Boundary Warp measures, for every column, where the covered area starts and ends. It smooths these two edge curves (a running maximum or minimum over 1/24 of the width, then a Gaussian) and remaps each column so its covered part reaches the top and bottom of the frame. The same is then done for rows, except for full 360° panoramas, whose left and right edges already meet. The slider blends between the original position (0) and the fully warped one (100).
Auto Crop finds the largest rectangle inside the covered area, then moves it in by one grid cell so no empty pixel slips in. For a full 360° panorama it keeps the full width and the tallest band of rows that is covered all the way across, so the result still wraps around. Without Auto Crop, you get the bounding box of all photos, and the parts that no photo covers stay black.
Seams and blending
Seams are found on a copy of about 0.8 megapixels. Each pixel starts out belonging to the photo it lies deepest inside. Then, for every pair of overlapping photos, a graph cut (max-flow) moves the seam to where the two photos agree. The cost of a seam is the color difference between the photos divided by the local detail, so seams prefer places where the photos match and avoid flat areas such as sky, where a small step would show. Seams also stay at least 2% of the panorama size away from the edge of each photo.
The photos are then blended with multi-band blending: each is split into a Laplacian pyramid of up to 7 bands. Fine detail switches sharply at the seam, so nothing doubles. Broad tones blend over a wide zone, so leftover brightness differences fade out instead of showing as a step. At full resolution, the panorama is rendered in strips of at least 1024 rows to limit memory, sampling each photo bicubically from the pyramid level that fits the output scale. Results larger than 200 megapixels are scaled down to 200 MP.
HDR merge
RAW brackets
Alignment. Features are found on copies brightened or darkened to the reference's exposure, so the same detail looks alike in every frame. Each frame gets a homography against its neighbour, and the steps are chained toward the reference. Frames that would move by less than 0.3 px are left untouched. A frame that can't be matched, or whose corners would move by more than 20% of the diagonal, is merged as it is, and the window shows "1 image couldn't be aligned".
Clip level and exposures. The clip level is the highest 99.9th percentile of the green channel across all frames. Then, for each pair of neighbouring frames, RapidRAW measures the real brightness ratio: the median ratio over all pixels between the noise floor and 70% of the clip level. It replaces the EXIF ratio when at least 200 pixels qualify and it is within a factor of 2 of it. Shutter speeds on the camera are rounded (1/60 s is really 1/64 s), and the measured ratio fixes that.
Weights. Each frame's pixel gets the weight
exposure × (1 − smoothstep(0.7, 0.9, level))
where level is the brightest channel divided by the clip level. So a frame fades out between 70% and 90% of clipping, and among the frames that aren't clipped, the longest exposure gets the most weight because it has the least noise. The darkest frame never fades out, so blown highlights in all the other frames still get a value. The result is the weighted average of each frame divided by its exposure: linear scene brightness, relative to the reference.
Example with a −2, 0, +2 EV bracket (relative exposures 0.25, 1 and 4):
| Pixel | −2 EV frame | 0 EV frame | +2 EV frame | Result comes from |
|---|---|---|---|---|
| Shadow under a tree, no frame near clipping | 0.25 | 1 | 4 | 76% from +2 EV, the cleanest frame |
| Bright cloud: 0 EV at 80% of clipping, +2 EV clipped | 0.25 | 1 × 0.5 = 0.5 | 0 | 67% from 0 EV, 33% from −2 EV |
| The sun, clipped in 0 EV and +2 EV | 0.25 | 0 | 0 | the −2 EV frame alone |
Deghosting. Deghosting is always on. RapidRAW starts the estimate with the reference frame alone and adds the other frames one by one, closest exposure first. Before it adds a frame, it compares the frame (divided by its exposure and slightly blurred) with the estimate so far. Where any channel differs by more than 0.25 in log units (about 28%, or 0.36 EV), something moved. That ghost mask is cleaned up, grown by 4 px and feathered, and the frame's weight is multiplied by (1 − mask). So in moving areas the reference wins. Where the reference is clipped there is nothing to compare against, and the darker frames fill in. The masks are made at preview size and scaled up for the full-resolution merge.
Output. The merge is saved as a linear float DNG (see Saving). Its baseline exposure is that of the reference frame, so it opens as bright as the middle exposure did. The edit starts with the AgX tone mapper, which rolls off the extra highlight range softly. Lens information stays in the metadata, so Lens Correction still finds the profile.
JPEG and mixed brackets
When not every frame is a RAW file, the frames hold display-ready, tone-mapped pixels, and their real brightness can't be recovered. RapidRAW uses exposure fusion (Mertens) instead: for each pixel and frame, the weight is
local contrast × saturation × well-exposedness
where well-exposedness is a Gaussian around mid grey (0.5 on gamma-encoded values, σ = 0.2) for each channel. The weights are normalized per pixel and the frames are blended in a Laplacian pyramid of up to 8 bands. Alignment works as for RAW brackets. There is no exposure math and no deghosting, and the result is a finished-looking 16-bit TIFF, not HDR data.
Focus stacking
Alignment. Focusing changes the magnification slightly (focus breathing), so frames don't line up. Each frame is aligned directly to the reference with an intensity-based method (Lucas-Kanade solved with Levenberg-Marquardt), coarse to fine. The model grows with the pyramid level: translation below 48 px (short side), similarity below 110 px, affine plus radial distortion below 300 px, and affine with cubic polynomial terms at the finest levels. Brightness gain and offset are solved at the same time, and Huber weights limit the pull of areas that differ between frames. Each frame starts from its neighbour's result, with the frames before and after the reference aligned in parallel.
Breathing changes smoothly through a stack, so the poses are then fitted with a quadratic curve along the stack, and every frame is pulled 35% toward it. Frames whose alignment failed take the fitted pose. Shifts below 0.25 px are ignored. After alignment, each frame's brightness is matched to the reference with the median ratio of its mid-tones (clamped to 0.5 to 2).
Focus measure and noise. For each frame, the energy (squared values) of the two finest Laplacian bands shows how much fine detail is there, then it is pooled with a Gaussian: σ = 1 for Detail, σ = 4 for Smooth. Noise looks like detail too, so RapidRAW estimates the noise floor from the reference frame (from the median of its finest band) and measures detail relative to it.
Fusion. Every frame is split into a Laplacian pyramid of up to 8 levels. On each level, a frame's weight is
(1 + measure / noise) ^ p
with p = 12 for Detail or 8 for Smooth at the finest level, multiplied by 0.75 for each coarser level and never below 3. A high exponent is close to "the sharpest frame wins". A lower one blends. Example: at a spot where frame A has 4 times the noise floor in detail and frame B 2 times (on every level), frame A gets this share:
| Level | Detail | Smooth |
|---|---|---|
| 0 (finest) | p = 12: 99.8% | p = 8: 98.3% |
| 2 | p = 6.75: 96.9% | p = 4.5: 90.9% |
| 4 and coarser | p = 3.8 to 3: 87% to 82% | p = 3: 82% |
So hairs and edges come from one frame, while broad tones blend smoothly, which avoids halos around the subject. Pixels near the edge of an aligned frame lose weight, so the borders don't leave marks.
Depth Map. The preview records which frame has the most detail at the third pyramid level and colors it from dark blue (first frame) through teal to yellow (last frame). Where even the best frame has less than 4 times the noise floor in detail, the color fades toward dark grey, so smooth backgrounds show up dark.
Saving
| Merge | All RAW | Other files |
|---|---|---|
| Panorama | <first photo>_Pano.dng |
<first photo>_Pano.tiff |
| HDR | <first photo>_HDR.dng |
<first photo>_HDR.tiff |
| Focus stack | <first photo>_Stacked.dng |
<first photo>_Stacked.tiff |
| Frame Editor and Create Collage | <first photo>_Collage.png |
The file is written to the folder of the first photo (for focus stacks, the first by file name). If the name is taken, by a file or by a leftover .rrdata sidecar, _1, _2 and so on are added, so an earlier result is never overwritten. The file is written to a temporary name first and then renamed, so a crash never leaves half a file.
- DNG: linear RGB (LinearRaw) with 16-bit float samples, in 256 px tiles compressed with Deflate and the floating-point predictor. The color matrix describes the Rec. 2020 working space, the baseline exposure comes from the reference photo, and the make and model from the camera. RapidRAW opens it with the RAW pipeline, so it keeps its full range for editing.
- TIFF: 16-bit, gamma-encoded, with an embedded profile for the Rec. 2020 working space and the camera's EXIF data.
- EXIF: the result's sidecar gets the EXIF data of the first stitched photo (panoramas) or of the reference frame (HDR and focus stacks). Panoramas lose the lens fields (lens model, focal length), because the stitcher already corrected distortion and vignetting. HDR merges and focus stacks keep them, so you can still turn on Lens Correction.
See also
- Productivity Tools to run the merges.
- RAW Processing for how the source photos are decoded.
- Geometry, Auto Tools & Export for lens correction and export.